Last updated on July 30, 2026
A properly built leather tool roll does more than organize tools. It protects their edges, keeps them together, and becomes more attractive every time it is used.
There is something especially satisfying about making workshop equipment from leather. Woodworking projects may eventually collect dents and scratches, but a well-made leather tool roll seems to improve with age. The surface darkens, the folds become more supple, and every mark records another day of honest use.
This project is designed as a durable ten-pocket roll suitable for chisels, carving tools, small files, punches, or similar hand tools. The outer shell is made from heavy 8–10-ounce top-grain leather, while the pocket panel uses more flexible 4–6-ounce leather. The pieces are joined by hand using natural or synthetic sinew, and every vertical pocket seam is reinforced with a two-piece snap rivet at both ends.
The finished roll measures approximately 24 inches wide by 16 inches tall when opened. Those dimensions provide enough room for a practical selection of tools without producing an awkward bundle when the roll is closed. However, the pocket arrangement should always be adjusted around the tools that will actually live inside it. Leather is too valuable to cut according to a generic pattern without first checking the fit.
Finished Dimensions
- Open size: approximately 24 inches wide by 16 inches tall
- Pocket panel: 22 inches wide by 7 inches tall
- Number of pockets: 10
- Top protective flap: approximately 5½ inches deep
- Closure strap: 1 inch wide by approximately 18 inches long
- Buckle tab: 1 inch wide by approximately 5 inches long
These dimensions create a general-purpose tool roll. Longer tools may require a taller shell, while wide carving tools or large chisels may require fewer, broader pockets.
Pattern Overview
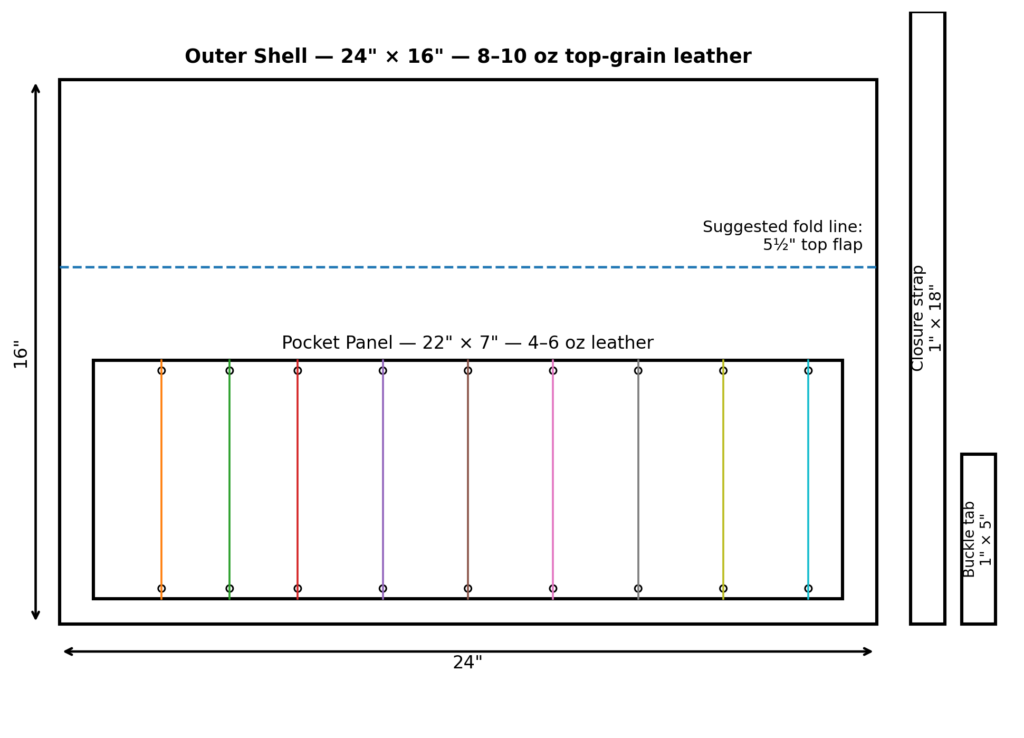
Materials
For the outer shell, select a piece of 8–10-ounce top-grain leather measuring at least 24 by 16 inches. Leather in this weight range is approximately ⅛ inch thick, although the exact thickness varies from hide to hide. It provides enough structure to protect the tools while remaining flexible enough to roll.
The pocket panel should be cut from 4–6-ounce leather. This lighter leather conforms more easily around individual tools and is less bulky where the seams overlap. A piece measuring 22 by 7 inches is sufficient for the layout shown here.
You will also need natural or synthetic sinew, two harness needles, a one-inch buckle, two-piece snap rivets, and optional leather for a keeper loop. Contact cement or leatherworking adhesive can be used to hold the pocket panel temporarily while the holes are punched, but the adhesive should never be considered a substitute for stitching.
Tools
A sharp utility knife or round knife will make the major cuts. A metal straightedge, cutting mat, wing divider, stitching groover, pricking iron or stitching chisel, scratch awl, mallet, rivet setter, hole punches, and edge beveler will complete most of the work.
A stitching pony is helpful but not essential. The project can be stitched in the lap or clamped carefully between padded boards, although a pony makes it easier to maintain even tension.
Begin With the Tools, Not the Leather
Before cutting anything, arrange the intended tools on a workbench. Place them approximately as they will sit inside the finished roll, leaving space between their handles and cutting edges. Large handles require wider pockets than the tool shafts suggest, so measure the widest part that must pass through each opening.
This is also the time to decide whether the tools will be inserted handle-first or edge-first. Chisels are commonly stored with their handles above the pockets and their cutting ends enclosed below. The upper flap then folds over the handles before the roll is closed, preventing the tools from sliding out.
Do not assume that ten identical pockets will work. A narrow carving chisel may need only two inches, while a broad bench chisel may need three inches or more. The sample layout uses several different widths, but it is only a starting point.
Example Pocket Layout
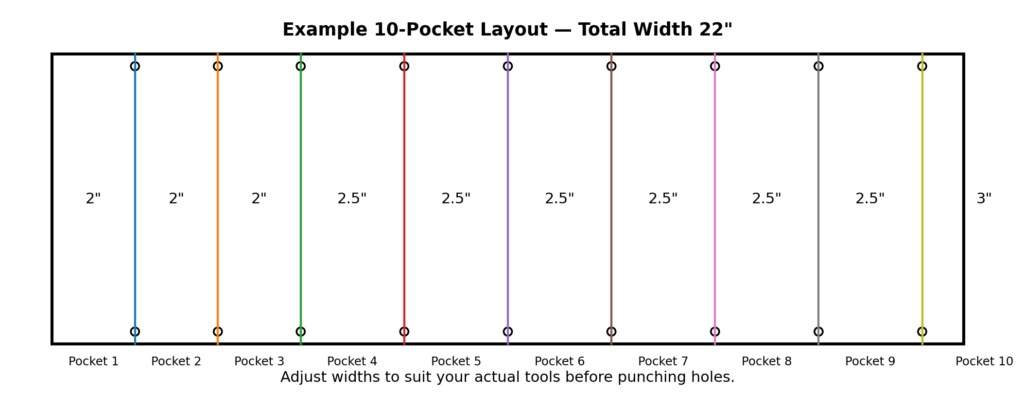
The illustrated arrangement divides the 22-inch pocket panel into the following widths:
2", 2", 2", 2½", 2½", 2½", 2½", 2½", 2½", 3"Together, these measurements total 22 inches. Test the arrangement with the actual tools before transferring the divisions to the leather.
Step 1: Cut the Outer Shell
Use a metal straightedge and a sharp knife to cut the outer shell to 24 by 16 inches. Make several controlled passes rather than attempting to force the blade through the leather in one cut. A clean edge now will save considerable finishing work later.
Check that the corners are square. They may be left square, clipped at an angle, or rounded using a coin or washer as a template. Rounded corners tend to resist curling and wear, although the choice is primarily aesthetic.
Once the shell has been cut, mark a horizontal flap line approximately 5½ inches below the upper edge. This is not a cut line. It simply indicates where the upper section will fold over the tool handles.
Step 2: Cut and Prepare the Pocket Panel
Cut the lighter leather to 22 by 7 inches. Center it across the lower portion of the shell, leaving a one-inch margin at each side and approximately a ¾-inch margin along the bottom.
The pocket panel can be left perfectly flat for narrow tools. For tools with substantial handles, a small amount of fullness can be introduced into each pocket before stitching. Place the actual tool under the panel, gently form the leather around it, and mark the seam position.
This fitting process is more reliable than dividing the panel with a ruler alone. Even a precisely measured pocket can be unusable if the intended handle will not pass through it.
Step 3: Finish the Exposed Edges
Bevel the exposed edges of the shell and the upper edge of the pocket panel. Lightly dampening and burnishing these edges will produce a smoother, more finished appearance.
The lower and side edges of the pocket panel will eventually be stitched against the shell, so they do not require the same degree of finishing. However, removing any rough fibers will help the pieces sit together cleanly.
This is also the best stage to apply dye, oil, or finish if the leather will be colored. Applying finish after assembly is possible, but it can be difficult to reach the areas between the pockets evenly.
Step 4: Position the Pocket Panel
Center the pocket panel on the shell and verify the one-inch side margins. Use a small amount of contact cement or leatherworking adhesive along the bottom and side edges to keep the panel from shifting.
Avoid coating the entire back of the pocket panel. The individual pockets need enough flexibility to form around the tools. Adhesive should be used only as an assembly aid.
Place the actual tools on the panel again and confirm every division. Once the stitching holes have been punched, changing the pocket widths will be difficult.
Step 5: Mark the Stitching Lines
Mark a stitching line along the bottom and both sides of the pocket panel, approximately ⅛ to 3⁄16 inch from the edge. Mark each vertical pocket division from the upper edge of the panel to the bottom seam.
At the upper and lower end of every vertical division, mark a rivet center approximately ⅜ inch from the corresponding edge of the panel. These rivets will act as mechanical stops, preventing stress at the end of the stitching from opening the seam.
The rivets should not replace the stitches. Their purpose is to reinforce the points where the seams receive the greatest strain as tools are inserted and removed.
Step 6: Punch the Stitching Holes
Use a stitching chisel or pricking iron to punch evenly spaced holes along the perimeter and each vertical division. A spacing of approximately five or six stitches per inch provides a durable seam without perforating the leather excessively.
Keep the tool perpendicular to the leather so the holes emerge in a straight line on the back. Place the work over a proper punching board rather than directly on a wooden bench. Punching into the bench will dull the teeth and may produce uneven holes.
At intersections, plan the spacing so the bottom seam and vertical seams meet cleanly. Avoid placing two holes so close together that they weaken the leather.
Step 7: Hand-Stitch the Perimeter
Thread two harness needles onto a length of natural or synthetic sinew. Saddle stitching is recommended because each stitch passes independently through the leather from both sides. Even if one section is damaged, the entire seam is less likely to unravel.
Begin at one lower corner and stitch along the bottom edge before working up the sides. Pull each stitch firmly enough to close the seam, but do not pull so tightly that the leather puckers.
Backstitch through two or three holes at the end of the seam, trim the sinew, and carefully secure the ends. Synthetic sinew may be heat-sealed cautiously, while natural sinew should be locked and trimmed according to its construction.
Step 8: Stitch and Rivet Each Pocket Division
Stitch each vertical pocket division independently. Starting near the bottom makes it easier to keep the panel aligned, although either direction will work if the pieces are secured properly.
After completing a seam, install one two-piece snap rivet at its upper end and another at its lower end. The rivet heads should sit flat against the leather without crushing it.
Stitch and Rivet Detail
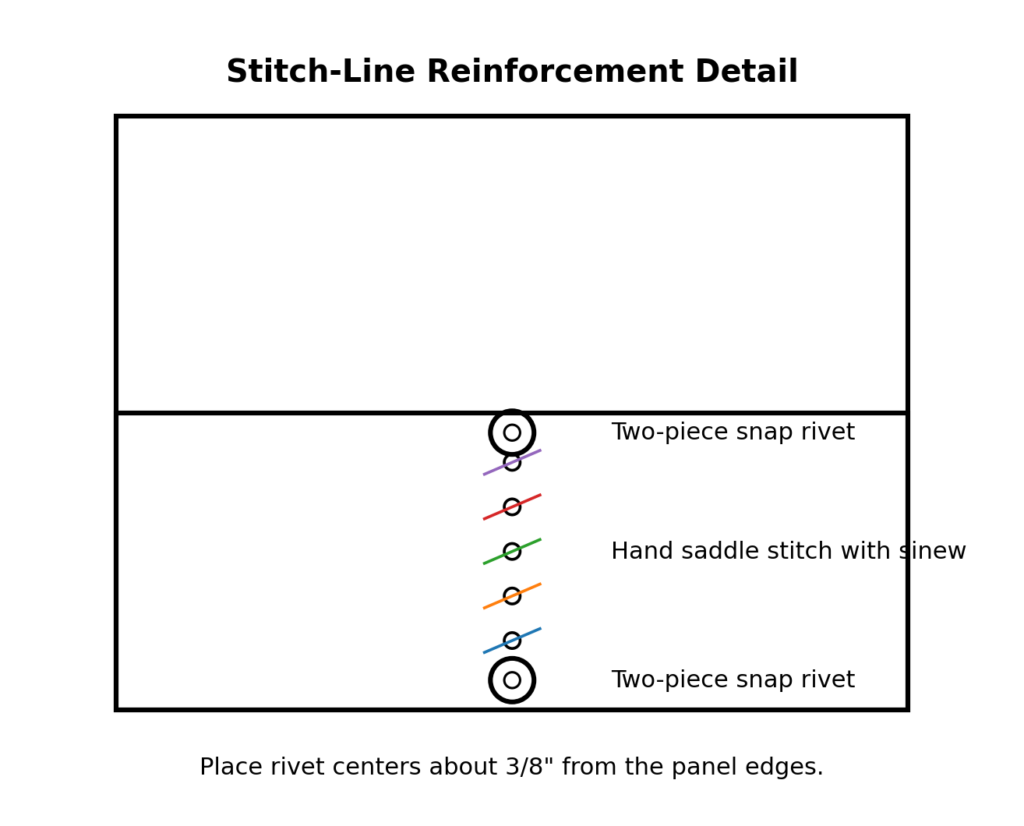
The sequence should be:
- Lower reinforcing rivet
- Hand-stitched vertical seam
- Upper reinforcing rivet
This arrangement prevents the ends of the seam from carrying the full opening force of the pocket. It also gives the finished roll the appearance of traditional working equipment rather than a lightly sewn storage pouch.
When setting each rivet, work on a firm anvil or metal setting surface. Strike the setter squarely. An angled blow may bend the post or leave the cap visibly crooked.
Step 9: Test the Pockets
Insert each tool slowly and check the fit. A new leather pocket may feel snug, but it should not require excessive force. The leather will relax slightly with use, so a close initial fit is preferable to a loose one.
If a pocket is too tight, lightly dampening the leather and allowing it to dry around a protected tool can help form it. Wrap steel tools before wet forming so moisture does not remain against the metal.
Check that the cutting edges do not contact stitching or rivet posts. Edge guards are advisable for extremely sharp chisels and carving tools, especially if the roll will be transported frequently.
Step 10: Fit the Upper Flap
Load the tool roll and fold the upper 5½-inch flap down over the handles. The flap should cover enough of each tool to prevent it from sliding out when the roll is carried vertically.
If the flap is too deep, it may create unnecessary bulk. If it is too shallow, shorter tools may escape. The 5½-inch dimension works for many common hand tools, but it can be adjusted before the leather develops a permanent crease.
Do not stitch the flap. Its purpose is to fold freely over the tools.
Step 11: Install the Buckle and Strap
Cut a closure strap approximately 1 inch wide by 18 inches long. Cut a second buckle tab approximately 1 inch wide by 5 inches long.
The exact attachment locations should not be marked until the completed roll has been loaded and rolled closed. Tool thickness determines the final diameter, and a measurement taken from an empty roll will usually be too short.
Roll the loaded tool roll from one end. Wrap the long strap around it and position the buckle where it can be reached easily. Mark the strap and buckle-tab locations directly on the outer shell.
Attach the buckle tab with stitching, rivets, or a combination of both. Attach the long strap on the opposite side so it passes around the entire roll before entering the buckle. Punch several adjustment holes in the strap to allow for changes in the number of tools carried.
Buckle and Strap Layout
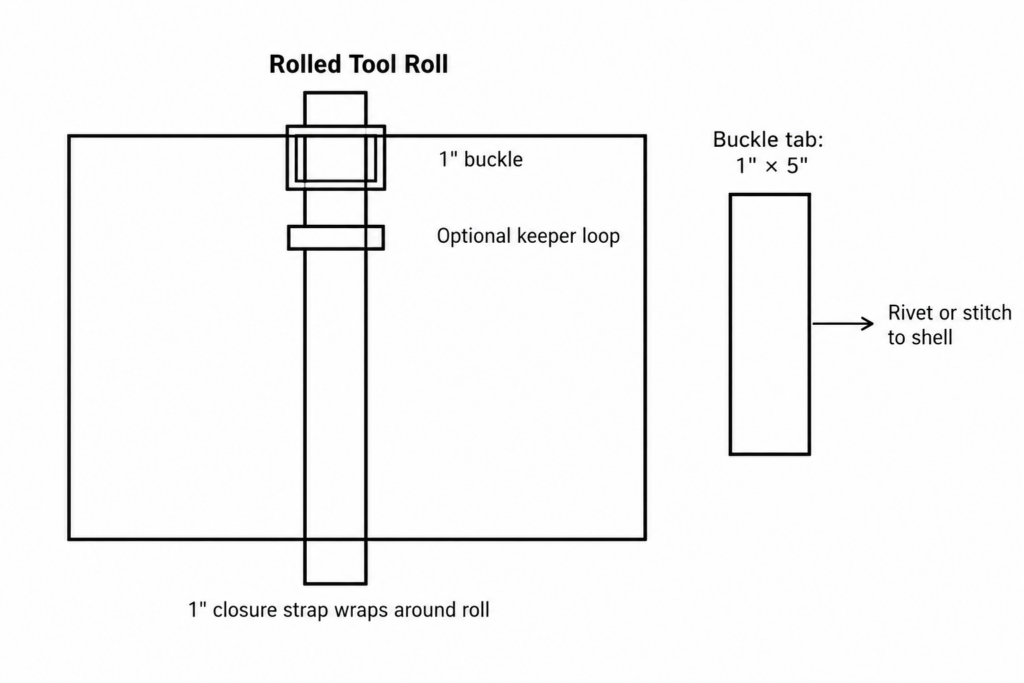
An optional keeper loop can be installed behind the buckle to contain the loose end of the strap.
Step 12: Condition and Form the Roll
Apply a light coat of appropriate leather conditioner, following the product instructions. Avoid saturating the leather. Too much oil can soften the shell excessively and may transfer to the tools.
Load the pockets, fold the flap, and roll the tool roll loosely. Fasten the buckle and leave it closed for a day or two. This allows the leather to begin forming naturally around the tools.
Over time, the roll will develop a shape unique to its contents. That is part of its character, not a flaw.
Built for Work, Not Display
A tool roll like this does not need to remain flawless. It is supposed to travel between the bench, the toolbox, and the job site. It will collect marks, darken where it is handled, and gradually conform to the tools it protects.
Those changes are exactly what make leather such a suitable workshop material. A plastic case becomes scratched and worn. Leather develops a history.
The heavy outer shell protects the tools. The lighter pocket panel keeps them separated without producing excessive bulk. Hand stitching provides a repairable seam, while the rivets protect the areas most likely to fail. The buckle allows the roll to expand or contract as its contents change.
More importantly, the finished project reflects the tools and habits of the person who made it. No two tool rolls need to be identical because no two makers carry precisely the same collection.
Measure the tools. Adjust the pockets. Take the time to place the stitching correctly. Then build something capable of serving for decades.
A lifetime tool roll should not merely last a long time.It should become better because it has been used.
The Idle Hands Workshop Philosophy
“A well-made project isn’t measured by how quickly it was finished, but by how many years of faithful service it provides. Build it carefully. Build it honestly. Then use it until it tells its own story.”
